Yesterday I told you about this month challenge at " If it's Groovy" and here is my take o the challenge I hope inspired you to join us at IIG and participate =) The challenge is call "incredible kids" ( This month the prize is sponsor by Guylou's Digi stamps) and we have to do and LO and write a letter to an incredible kid in our lives I knew I have to do something about my kids ( the only incredible kids I really know he he he) but how do I choose???? they are both so incredible in their own way. First I decide to scrap a pic of my 2 kids together and went I got to the part of writing the letter I got stuck should I write two letters and put in one envelope? o half letter for Andy and half for Mia ? one for both? ahh!!! couldn't decided so my LO ended up sitting in my desk for a few day.... then I got a package in the mail of new photos from snapfish that I had order and while looking at the pics my eyes land in this 2 , one of Mia in her tutu and this other one of Andy with a nice comb hair and with the same background and immediately know this were the pics I want to scrap for this challenge.
I decided to start from zero and do almost 2 exactly LOs just in the feminine and masculine version. And I loveeeee what I did... I have never done this before and was very fun trying to match the 2 LOs just in different color.... I really think everyone should give it a try.
Ayer les conte sobre el reto de este mes en "If it's Groovy" y les quiero enseniar mi propuesta para este reto, espero les inspire a participar en IIG con nosotros =) El reto se llama "ninios increibles" (este mes el premio sera patrocinados por Guylou's Digi stamps) y tienes que hacer una pagina y escribirle una carta a algun ninio incleible en tu vida, inmediatamente supe que iba a hacer algo acerca de mis hijos (los unicos ninios que en realidad conozco y son increibles para mi) pero como escojia? los dos tienen sus qualidades tan unicas asi que primero decidi hacer una pagian con una foto de los 2 pero cuando llegue a la parte de escribir la carta me quede estancada , escribo una carta para los 2, mitad para Mia , mitad para Andy? 2 separadas en un sobre? Ahhh!! que indecision asi que deje mi pagina ahi por unos dias ....y saben que me llego un sobre de unas fotos que habia ordenado en snapfish y cuando las miraba mis ojos se cautivaron con estas 2 ...Mia bella en su tutu y Andy peinadito y guapo y las 2 con el mismo fondo...supe ahi que esas eran las fotos que queria scrapear para este reto.
Empeze nuevamente de cero y decidi hace 2 pagina casi identicas en la version femenina y masculina respectivamente y saben que ME ENCANTO nunca habia esto hecho esto antes y fue muy divertido tratar de combinar todo pero en diferente color...deberian tratarlo!!!
After I choose my base brown cardstock , I cut this shape frame and doddle around , used a punch for the stripe paper and add a little border . I decided to place both pictures over a yellow cardstock and place in the page with 3D dots so I can hide under the pic ,the letter ( if you haven't notice I like to hide mine journalings, I just picture my kids all grow up looking at their scrapbooks and finding this little journalings a cute things just for them , awww!!! ) So I made this big tag (which can be pull out from under the picture) and place the letter there . And that all , really happy with my pages :)
Despues que escoji mi base color cafe corte un marco en esta forma que no se como se llama y le hize doddle alrededor, use un troquelador para el papel de rayas y agrege un borde. decidi poner las 2 fotos sobre cartulina amarilla y egarla en 3D para si poder esconder mi carta debajo de las fotos ( si no se han dado cuenta me gusta esconder mis journalings, es que me imajina a mis ninios ya grandes mirando sus albunes y encontrando estas notitas solo para ellos...ohhhh) entonces hize un tag frande coloque la carta ahi y puede ser jalada de debajo de la foto. Eso es todo quede muy contenta con mis paginas :)
***************************************************
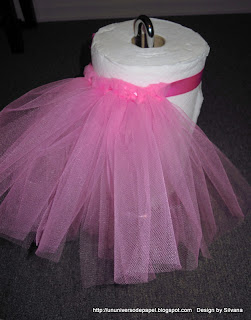
NO SEW TUTU TUTORIAL (Mia is wearing in the layout's pic)
TUTORIAL PARA UN TUTU SIN COSER (Mia lo esta usando en la foto del LO)
****************************************************
Supplies:
- 3 yards of satin ribbon ( total =waist + bow)
- 4 yards of tull or a roll of tull
- scissors
First: you have to cut lot and lots strips of tull of about 5" wide x 36" total long ( or the long you desire x 2)
Second: tie the satin ribbon to a paper towel (in a paper towel holder) and make a big bow
Third: fold the stip of tull in half and tie it to the ribbon like the following step by step picture
Materiales:
- 3 yardas de cinta de seda ( total = cintura mas lazo)
- 4 yardas de tulle o un rollo de tull
- tijeras
Primero: corta muchas y muchas tiras de tulle en mas o menos 5" de ancho por 36" de largo total (o el largo que quieras multiplicado x 2)
Segundo: amarra la cinta a un rollo de servilletas de papel (en su porta rollo) y haz un lazo grande
Tercero: dobla la tira por la mitad y empieza a amarrala en la cinta siguiendo las instruciones paso a paso de la foto a continuacion.
Fourth: Repit last step until you fill the ribbon
Cuarto: Repite este paso muchas veces hasta que llenes la cinta
And voila!!! a cute tutu
Y listo!!! un lindo tutu


6 comments:
¡Hola!
Me gustan mucho tus dos versiones del LO, ambas te quedaron bellas, y el tuto del tutu, jajajaja está muy padre y lo mejor de todo es no coser!!! Wow!!! gracias por compartirlo.
Saludos.
Hola Silvana pero que lindos LOs pues como no son niños increíbles. Por cierto gracias por ese tuto tan interesantes a muchas no se nos da eso de coser en máquina jajaja.
Saludos.
http://crea-lo-inimaginable.blogspot.com
Hola
Esta fabuloso tu trabajo, con detalles adorables y delicados.
El tutorial esta super, gracias por compartir.
Te felicito!
-Sony
Sonia-Studio60
Ay sil!!! Siempre tan trabajadora!!! Todo muy muy bonito!! :D Suerte en todos los retoas que has hecho y los que hagas ;)
Abrazossss!!
Ay que hermoso. Me encantan ambas páginas, es una idea perfecta.
I love the idea of two versions of the LO for your kids. I'm sure they will cherish the letter to them and the LO !
Post a Comment